Complete Guide to Celery: Background Task Processing in Python
Introduction to Celery
Celery is a powerful, open-source distributed task queue system designed for Python applications. Celery helps you run time-consuming tasks in the background, allowing your main application to remain responsive and handle user requests efficiently. Think of Celery as a helpful assistant that takes care of lengthy jobs while your main application continues serving users without interruption.
"Celery is a simple, flexible, and reliable distributed system to process vast amounts of messages, while providing operations with the tools required to maintain such a system. It's a task queue with focus on real-time processing, while also supporting task scheduling."
— Ask Solem, Creator of Celery
"Python is an experiment in how much freedom programmers need. Too much freedom and nobody can read another's code; too little and expressiveness is endangered."
— Guido van Rossum, Creator of Python
Understanding the Basics
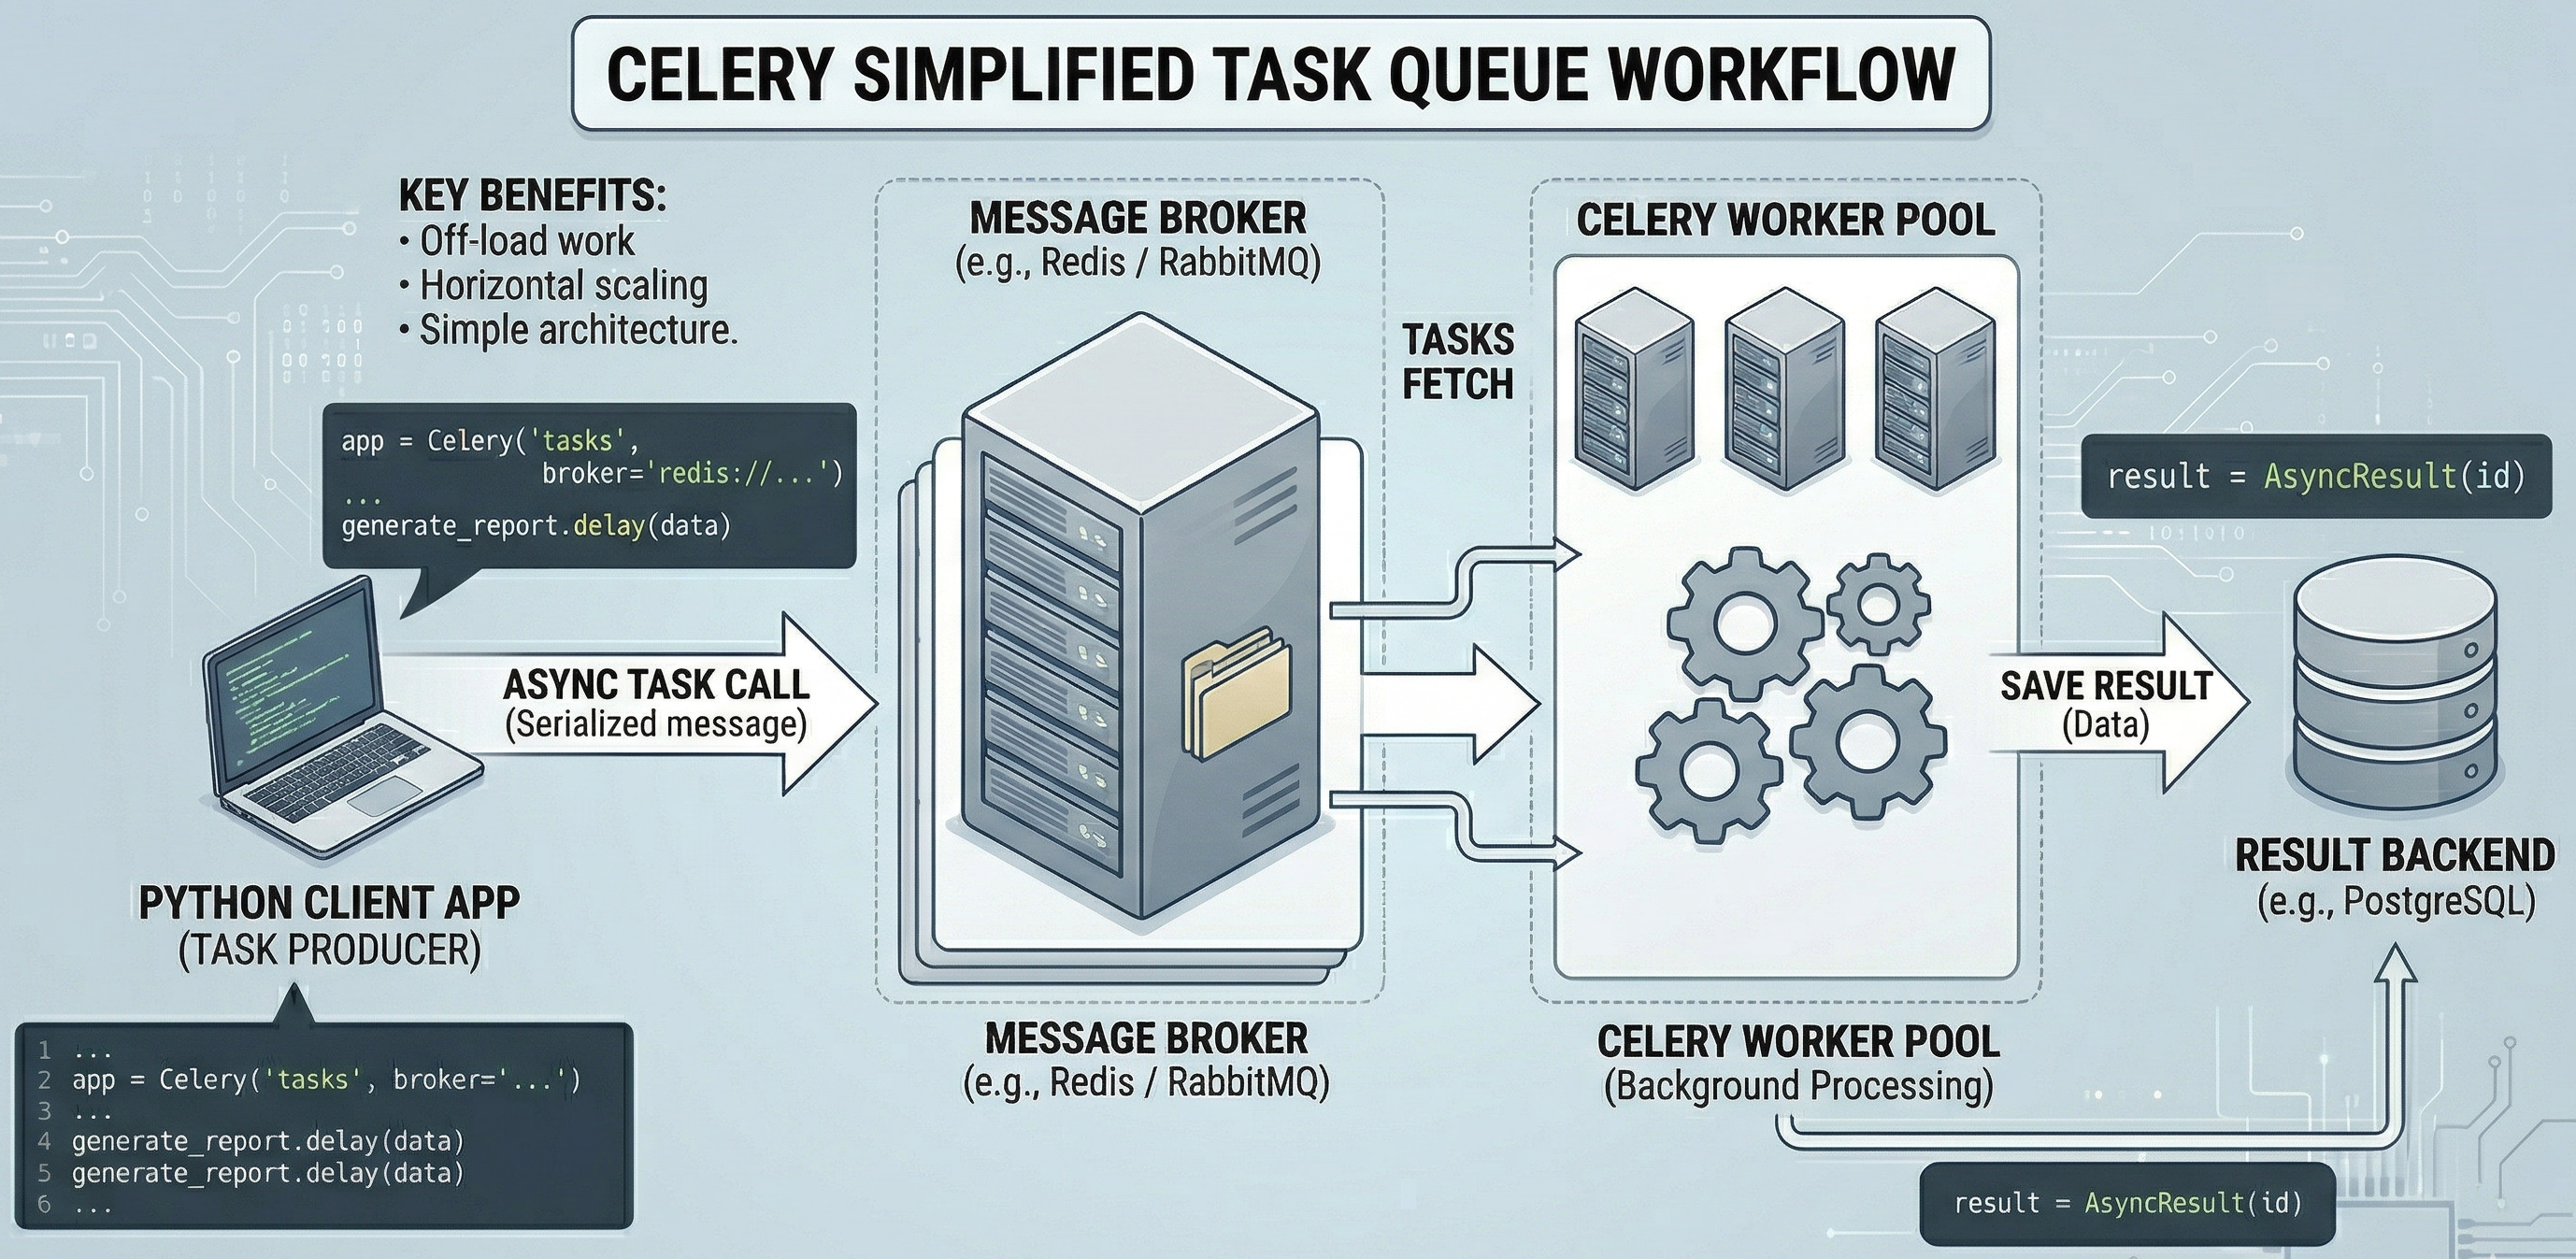
When you build web applications, you often encounter tasks that take a long time to complete. These might include sending emails, processing large files, generating reports, making external API calls, or performing complex calculations. If you handle these tasks synchronously (meaning your application waits for them to finish), your users will experience frustrating delays. This is where Celery comes to the rescue.
Celery operates on a simple but powerful principle. When your application encounters a time-consuming task, instead of executing it immediately, it sends a message to Celery describing what needs to be done. Celery workers, which are separate processes running in the background, pick up these messages and execute the tasks independently. Your main application can immediately return a response to the user, creating a smooth and responsive experience.
How Celery Works: The Architecture
"Simple is better than complex. Complex is better than complicated."
— Tim Peters, The Zen of Python (PEP 20)
Core Components: Celery's architecture consists of four main components working together harmoniously.
1. Task Producer (Your Application)
This is your main application, whether it's a Django web app, a Flask API, or any Python program. When it needs to perform a background task, it creates a task message and sends it to the message broker. The producer doesn't wait for the task to complete, it simply hands off the work and continues with other operations.
2. Message Broker
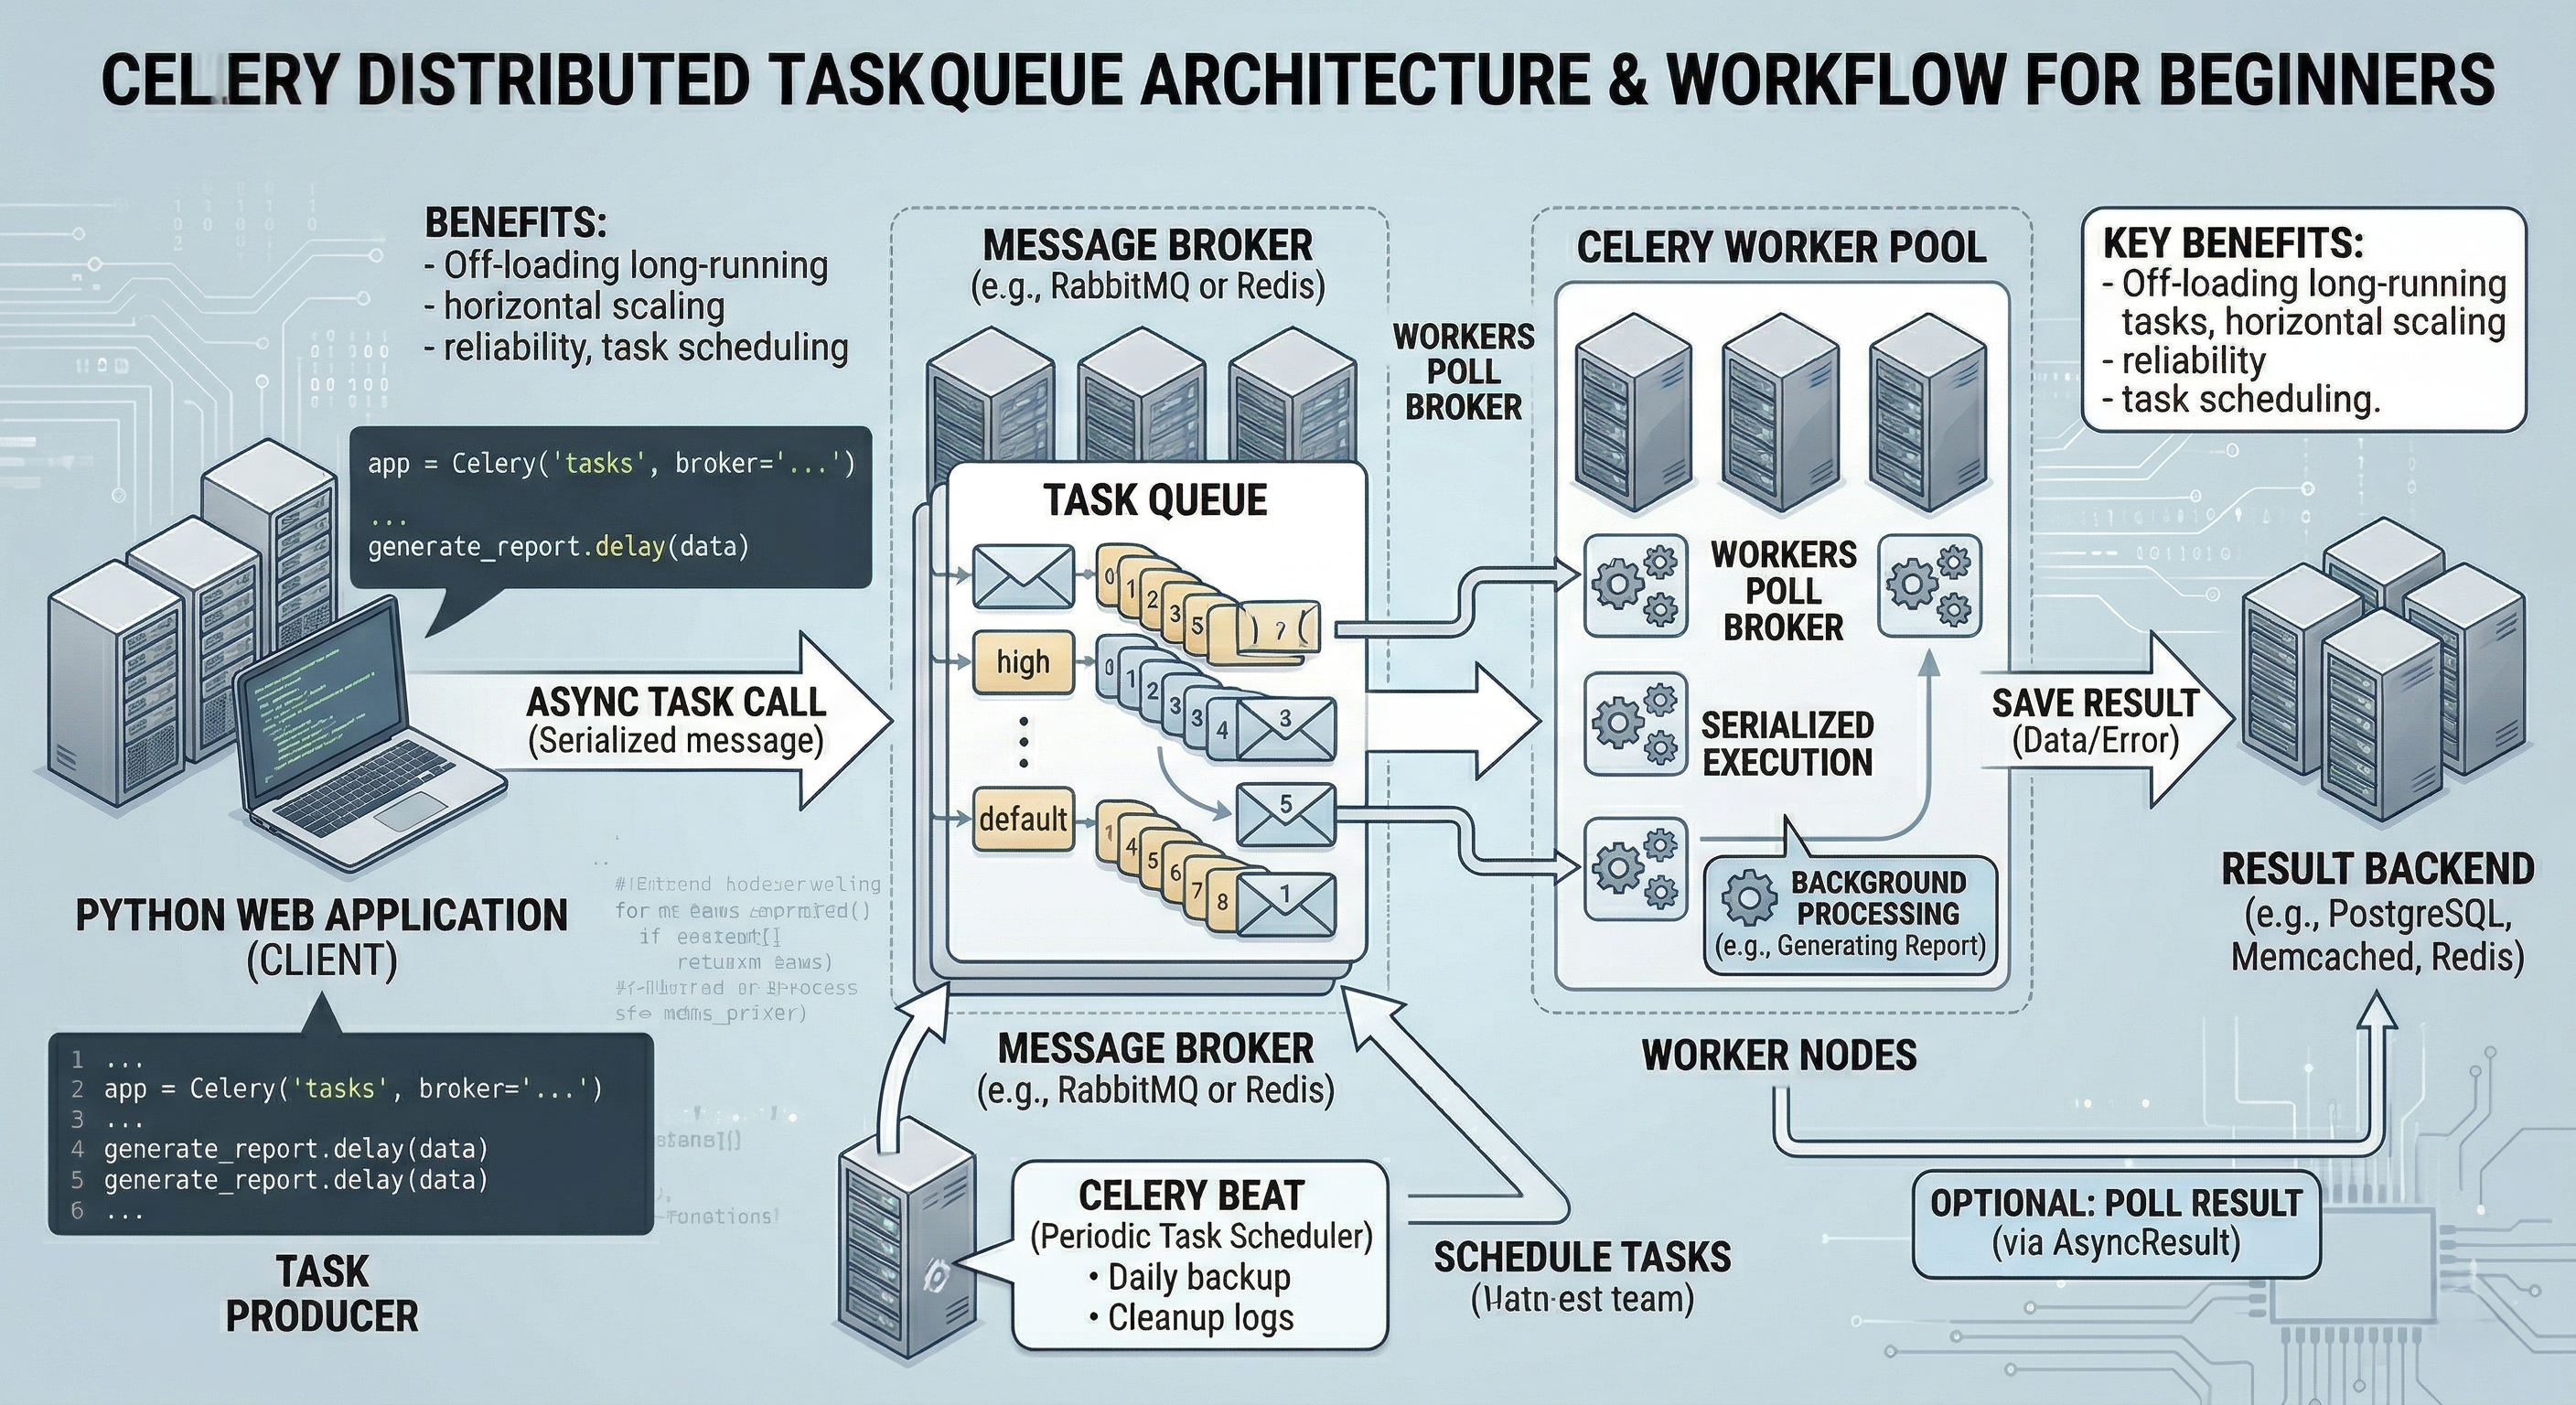
The message broker acts as a middleman between your application and the Celery workers. It receives task messages from your application and stores them in a queue until workers are ready to process them. The two most popular message brokers for Celery are Redis and RabbitMQ. The broker ensures that tasks are delivered reliably and can handle thousands of messages per second in production environments.
3. Celery Workers
Workers are separate processes that constantly monitor the message broker for new tasks. When a task arrives, a worker picks it up, executes the code, and moves on to the next task. You can run multiple workers simultaneously, either on the same machine or distributed across different servers, allowing your system to process many tasks concurrently and scale horizontally as your workload grows.
4. Result Backend (Optional)
When you need to know the outcome of a task, Celery can store results in a result backend. This could be the same Redis instance you're using as a broker, or a database like PostgreSQL or MongoDB. The result backend allows you to check whether a task completed successfully, retrieve its return value, or access error information if something went wrong.
Installing and Setting Up Celery
Getting started with Celery is straightforward. First, you need to install Celery itself along with a message broker.
Installation Steps
Begin by installing Celery using pip. The recommended approach is to install Celery with the Redis extras bundle, which includes all necessary dependencies for using Redis as your broker:
# Install Celery with Redis support (recommended)
pip install celery[redis]
# Or install Celery alone (you'll need to install broker dependencies separately)
pip install celery
Next, you need to install a message broker. For beginners, Redis is often the easiest choice because of its simplicity and speed. Here are the installation commands for different platforms:
# Linux (Ubuntu/Debian)
sudo apt install redis-server
# macOS (Using Homebrew)
brew install redis
brew services start redis
# Windows (Using winget)
winget install Redis.Redis
# Docker (Cross-platform)
docker run -d --name redis -p 6379:6379 redis
After installing Redis, verify it's running correctly:
# Test Redis connection
redis-cli ping
# Expected output: PONG
Creating Your First Celery Application
Let's create a simple Celery application. Create a file named tasks.py:
from celery import Celery
# Create a Celery instance
app = Celery('tasks', broker='redis://localhost:6379/0')
# Define a task
@app.task
def add_numbers(x, y):
"""A simple task that adds two numbers"""
return x + y
@app.task
def send_email(recipient, subject, body):
"""Simulate sending an email"""
import time
time.sleep(5)  # Simulate delay
print(f"Email sent to {recipient}")
return f"Email sent successfully"
The first argument to Celery, 'tasks', is the name of your module. The broker parameter
tells Celery where to find your message broker. The @app.task decorator transforms regular Python
functions into Celery tasks that can be executed asynchronously.
Starting the Worker
To process tasks, you need to start a Celery worker. Open a terminal and run:
celery -A tasks worker --loglevel=infoThis command tells Celery to look for tasks in the tasks module and start a worker process. You'll see
output indicating the worker is ready and waiting for tasks.
Calling Tasks
Now you can call your tasks from another Python script or interactive session:
from tasks import add_numbers, send_email
# Call task asynchronously
result = add_numbers.delay(4, 6)
# The function returns immediately with a task ID
print(f"Task ID: {result.id}")
# Later, check if task is complete
print(f"Task ready: {result.ready()}")
# Get the result (this will wait until task completes)
print(f"Result: {result.get()}")
# You can also use apply_async for more control
result = add_numbers.apply_async(
args=[4, 6],
countdown=10,  # Execute after 10 seconds
expires=60,    # Expire if not executed within 60 seconds
)
print(f"Scheduled Task ID: {result.id}")
Integrating Celery with Django
Django is one of the most popular frameworks for using Celery. The integration requires a few configuration steps but provides powerful capabilities for handling background tasks in web applications.
Django Setup
First, install the required packages:
pip install celery[redis] djangoCreate a celery.py file in your Django project directory (next to settings.py):
import os
from celery import Celery
from django.conf import settings
# Set default Django settings
os.environ.setdefault('DJANGO_SETTINGS_MODULE', 'myproject.settings')
# Create Celery app
app = Celery('myproject')
# Load config from Django settings with CELERY prefix
app.config_from_object('django.conf:settings', namespace='CELERY')
# Auto-discover tasks from all registered Django apps
app.autodiscover_tasks(lambda: settings.INSTALLED_APPS)
In your project's __init__.py, import the Celery app:
from .celery import app as celery_app
__all__ = ('celery_app',)
Add Celery configuration to your settings.py:
CELERY_BROKER_URL = 'redis://localhost:6379/0'
CELERY_RESULT_BACKEND = 'redis://localhost:6379/0'
CELERY_ACCEPT_CONTENT = ['json']
CELERY_TASK_SERIALIZER = 'json'
CELERY_RESULT_SERIALIZER = 'json'
CELERY_TIMEZONE = 'UTC'
Now you can create tasks in any Django app by creating a tasks.py file:
from celery import shared_task
from django.core.mail import send_mail
@shared_task
def send_welcome_email(user_email):
"""Send welcome email to new users"""
send_mail(
'Welcome!',
'Thank you for signing up.',
'[email protected]',
[user_email],
)
return f"Welcome email sent to {user_email}"
Integrating Celery with Flask
Reference: Flask Official — Using Celery
Flask is another popular framework that integrates well with Celery. Since Flask doesn't have a built-in task discovery mechanism like Django, the setup uses a factory pattern to share the Flask application context with Celery.
Flask Setup
First, install the required packages:
pip install celery[redis] flaskCreate a make_celery function that wraps Celery tasks in the Flask application context. This is the pattern recommended by the official Flask documentation:
from celery import Celery, Task
from flask import Flask
def celery_init_app(app: Flask) -> Celery:
class FlaskTask(Task):
def __call__(self, *args, **kwargs):
with app.app_context():
return self.run(*args, **kwargs)
celery_app = Celery(app.name, task_cls=FlaskTask)
celery_app.config_from_object(app.config["CELERY"])
celery_app.set_default()
app.extensions["celery"] = celery_app
return celery_app
Use this in your Flask app factory:
from flask import Flask
app = Flask(__name__)
app.config.from_mapping(
CELERY=dict(
broker_url="redis://localhost:6379/0",
result_backend="redis://localhost:6379/0",
task_ignore_result=True,
),
)
celery_app = celery_init_app(app)
Create tasks that can access the Flask application context:
from celery import shared_task
@shared_task
def process_data(data_id):
"""Process data in the background"""
from app.models import Data  # Import inside task to avoid circular imports
data = Data.query.get(data_id)
# Perform processing...
return f"Processed data #{data_id}"
Use the task in a Flask route:
@app.route("/process/", methods=["POST"])
def start_processing(data_id):
result = process_data.delay(data_id)
return {"task_id": result.id, "status": "Processing started"}, 202
Message Brokers: Redis vs RabbitMQ
Choosing the right message broker is an important decision that affects your application's performance and reliability. Let's explore the two most popular options.
Redis as a Message Broker
Redis is an in-memory data store that's incredibly fast and simple to set up. It's an excellent choice for applications where speed is paramount and you can tolerate occasional message loss in extreme scenarios like server crashes.
Advantages: Redis is lightning fast because it keeps data in memory. It's easy to install and configure, making it perfect for development and smaller applications. Redis also handles high throughput exceptionally well, processing thousands of messages per second with minimal latency.
Limitations: Redis doesn't guarantee message delivery in all scenarios. If your Redis server crashes before saving data to disk, you might lose some messages. It also lacks advanced routing features that some complex applications might need.
RabbitMQ as a Message Broker
RabbitMQ is a dedicated message broker built specifically for reliable message delivery. It's the choice for production systems where you absolutely cannot afford to lose tasks.
Advantages: RabbitMQ provides guaranteed message delivery through acknowledgments and persistent storage. It offers sophisticated routing capabilities with different exchange types, allowing complex message distribution patterns. RabbitMQ is battle-tested in enterprise environments and provides excellent monitoring tools.
Limitations: RabbitMQ is more complex to set up and configure compared to Redis. It may have slightly higher latency than Redis, though this is often negligible for most applications.
Recommendation: Start with Redis for development and smaller applications. If your application grows and requires guaranteed message delivery or complex routing, consider switching to RabbitMQ. Many production systems use RabbitMQ as the broker and Redis as the result backend, combining the strengths of both systems.
Advanced Celery Features
"Concurrency is all about taking advantage of the computing power you've got."
— Raymond Hettinger, Python Core Developer (from his PyCon talk on concurrency)
Task Workflows with Canvas
Celery provides powerful primitives for creating complex task workflows. These patterns allow you to chain tasks together, run tasks in parallel, and coordinate multiple operations.
Chains: Sequential Task Execution
Chains allow you to link tasks together so they execute one after another, with each task passing its result to the next task as input:
from celery import chain
from tasks import process_data, analyze_results, send_report
# Create a chain of tasks
workflow = chain(
process_data.s(raw_data),
analyze_results.s(),
send_report.s()
)
# Execute the chain
result = workflow.apply_async()
In this example, process_data runs first. When it completes, its result is automatically passed to
analyze_results, and finally, those results go to send_report. This creates a pipeline
where data flows from one task to the next.
Groups: Parallel Task Execution
Groups let you execute multiple tasks simultaneously, which is perfect for operations that can run independently:
from celery import group
from tasks import resize_image
# Process multiple images in parallel
job = group([
resize_image.s(image_id=1, width=800),
resize_image.s(image_id=2, width=800),
resize_image.s(image_id=3, width=800),
])
result = job.apply_async()
# Wait for all tasks to complete
results = result.get()
Chords: Parallel Tasks with a Callback
Chords combine groups with a callback function that runs after all parallel tasks complete. This is useful when you need to aggregate results from multiple parallel operations:
from celery import chord
from tasks import fetch_data, combine_results
# Fetch data from multiple sources in parallel,
# then combine results
workflow = chord([
fetch_data.s(source='api1'),
fetch_data.s(source='api2'),
fetch_data.s(source='api3'),
])(combine_results.s())
result = workflow.apply_async()
Important Note: Chords have some overhead due to the synchronization step. Use them when necessary, but avoid over-complicating your workflows. The Celery documentation recommends using chords judiciously.
Periodic Tasks with Celery Beat
Celery Beat is a scheduler that allows you to run tasks at regular intervals, similar to cron jobs. This is perfect for maintenance tasks, data synchronization, or generating daily reports.
Configure periodic tasks in your settings:
from celery.schedules import crontab
app.conf.beat_schedule = {
'send-daily-report': {
'task': 'tasks.generate_daily_report',
'schedule': crontab(hour=9, minute=0),  # Run at 9 AM
},
'cleanup-old-data': {
'task': 'tasks.cleanup_database',
'schedule': crontab(hour=2, minute=0),  # Run at 2 AM
},
'check-every-5-minutes': {
'task': 'tasks.health_check',
'schedule': 300.0,  # Run every 5 minutes
},
}
Start the Beat scheduler alongside your workers:
celery -A tasks beat --loglevel=infoTask Retry and Error Handling
Tasks can fail for many reasons, such as network issues or temporary service outages. Celery provides built-in retry mechanisms. Here's a basic retry example:
@app.task(bind=True, max_retries=3)
def call_external_api(self, url):
try:
response = requests.get(url, timeout=5)
return response.json()
except requests.RequestException as exc:
# Retry after 5 seconds
raise self.retry(exc=exc, countdown=5)
The bind=True parameter gives you access to the task instance through self, allowing you to
call self.retry(). The max_retries parameter limits how many times the task will retry
before giving up.
Exponential Backoff Retries
For production systems, exponential backoff is the preferred retry strategy. Instead of retrying at fixed intervals, the delay increases with each attempt, reducing pressure on the failing service:
# Method 1: Using retry_backoff (recommended, Celery 4.1+)
@app.task(bind=True, autoretry_for=(requests.RequestException,),
retry_backoff=True, retry_backoff_max=600, max_retries=5)
def call_api_with_backoff(self, url):
"""Automatically retries with exponential backoff on RequestException"""
response = requests.get(url, timeout=10)
response.raise_for_status()
return response.json()
# Method 2: Manual exponential backoff
@app.task(bind=True, max_retries=5)
def call_api_manual_backoff(self, url):
try:
response = requests.get(url, timeout=10)
response.raise_for_status()
return response.json()
except requests.RequestException as exc:
# 2^retries: 1s, 2s, 4s, 8s, 16s
backoff = 2 ** self.request.retries
raise self.retry(exc=exc, countdown=backoff)
Time Limits
To prevent tasks from running indefinitely, set soft and hard time limits. The soft limit raises a SoftTimeLimitExceeded exception that you can catch for graceful cleanup. The hard limit forcefully kills the worker process:
from celery.exceptions import SoftTimeLimitExceeded
@app.task(soft_time_limit=60, time_limit=90)
def process_large_file(file_path):
"""Process a large file with time limits.
- soft_time_limit=60: raises SoftTimeLimitExceeded after 60s
- time_limit=90: forcefully kills the task after 90s
"""
try:
with open(file_path, 'r') as f:
for chunk in read_chunks(f):
process_chunk(chunk)
except SoftTimeLimitExceeded:
# Graceful cleanup: save progress, close connections
save_progress(file_path)
raise  # Re-raise to mark the task as failed
Task Routing and Queues
As your application grows, you'll want to route different types of tasks to different queues. This allows you to prioritize critical tasks, isolate resource-heavy operations, and scale workers independently for each queue.
Declaring Multiple Queues
Define separate queues for different task priorities in your Celery configuration:
from kombu import Queue
app.conf.task_queues = [
Queue('critical', routing_key='critical'),
Queue('default', routing_key='default'),
Queue('low_priority', routing_key='low_priority'),
]
app.conf.task_default_queue = 'default'
Routing Tasks to Queues
You can route tasks to specific queues in several ways:
# Method 1: Route in configuration
app.conf.task_routes = {
'tasks.send_payment_notification': {'queue': 'critical'},
'tasks.process_upload': {'queue': 'default'},
'tasks.generate_monthly_report': {'queue': 'low_priority'},
}
# Method 2: Route at call time
send_payment_notification.apply_async(
args=[user_id, amount],
queue='critical'
)
# Method 3: Route in the task decorator
@app.task(queue='critical')
def send_payment_notification(user_id, amount):
# Critical: must be processed immediately
pass
Starting Workers on Specific Queues
Start workers that only consume from specific queues:
# Worker that only processes critical tasks
celery -A tasks worker -Q critical --concurrency=4 --loglevel=info
# Worker that processes both default and low_priority tasks
celery -A tasks worker -Q default,low_priority --concurrency=2 --loglevel=info
When to use separate queues: Use separate queues when you have tasks with vastly different priorities (payment processing vs. report generation), different resource requirements (CPU-heavy vs. I/O-heavy), or when you need to scale certain task types independently.
Monitoring and Managing Celery
Flower: Web-Based Monitoring
Flower is the most popular monitoring tool for Celery. It provides a beautiful web interface where you can see all your workers, monitor task execution in real-time, and manage your Celery cluster.
Install Flower:
pip install flowerStart Flower:
celery -A tasks flower --port=5555Now visit http://localhost:5555 in your browser. You'll see a dashboard showing worker status, active
tasks, task history, and performance metrics. Flower displays detailed information about each task, including
arguments, execution time, and results. This visibility is invaluable for debugging and optimizing your application.
Command-Line Monitoring
Celery provides several command-line tools for monitoring and managing workers:
# Check worker status
celery -A tasks inspect active
# See registered tasks
celery -A tasks inspect registered
# View worker statistics
celery -A tasks inspect stats
# Purge all waiting tasks (use with caution!)
celery -A tasks purge
# Shutdown a worker
celery -A tasks control shutdown
Common Use Cases with Code Examples
Sending Emails
Email sending is one of the most common use cases for Celery. Instead of making users wait while their email is sent, you can queue the email task and return immediately:
from celery import shared_task
from django.core.mail import EmailMultiAlternatives
from django.template.loader import render_to_string
@shared_task(bind=True, max_retries=3, default_retry_delay=60)
def send_html_email(self, recipient, subject, template_name, context):
"""Send an HTML email in the background with automatic retries"""
try:
html_content = render_to_string(template_name, context)
email = EmailMultiAlternatives(
subject=subject,
body="Plain text fallback",
from_email="[email protected]",
to=[recipient],
)
email.attach_alternative(html_content, "text/html")
email.send()
return f"Email sent to {recipient}"
except Exception as exc:
raise self.retry(exc=exc)
# Usage in a Django view:
# send_html_email.delay("[email protected]", "Welcome!", "emails/welcome.html", {"name": "John"})
Image Processing
Processing media files can take significant time. Celery allows you to handle uploads quickly while processing happens in the background:
from celery import shared_task
from PIL import Image
import os
@shared_task(ignore_result=True)
def generate_thumbnail(image_path, sizes=None):
"""Generate multiple thumbnail sizes for an uploaded image"""
sizes = sizes or [(150, 150), (300, 300), (600, 600)]
base, ext = os.path.splitext(image_path)
with Image.open(image_path) as img:
for width, height in sizes:
thumbnail = img.copy()
thumbnail.thumbnail((width, height), Image.LANCZOS)
thumb_path = f"{base}_thumb_{width}x{height}{ext}"
thumbnail.save(thumb_path, optimize=True, quality=85)
return f"Generated {len(sizes)} thumbnails for {image_path}"
# Usage:
# generate_thumbnail.delay("/uploads/photo.jpg")
Webhook Delivery
When your application needs to notify external services via webhooks, Celery provides reliable delivery with automatic retries and exponential backoff:
import requests
from celery import shared_task
from celery.utils.log import get_task_logger
logger = get_task_logger(__name__)
@shared_task(bind=True, autoretry_for=(requests.RequestException,),
retry_backoff=True, retry_backoff_max=3600, max_retries=8)
def deliver_webhook(self, webhook_url, payload, headers=None):
"""Deliver a webhook with exponential backoff retry.
Retries: 1s, 2s, 4s, 8s, 16s, 32s, 64s, 128s (capped at 3600s)
"""
headers = headers or {"Content-Type": "application/json"}
response = requests.post(webhook_url, json=payload, headers=headers, timeout=10)
response.raise_for_status()
logger.info(f"Webhook delivered to {webhook_url}, status: {response.status_code}")
return {"status": response.status_code, "url": webhook_url}
# Usage:
# deliver_webhook.delay("https://api.example.com/hook", {"event": "order.completed", "order_id": 42})
Data Analysis and Report Generation
Complex calculations and report generation can run as background tasks, allowing users to continue working while their reports are prepared.
Database Maintenance
Regular cleanup tasks, backups, and data aggregation can run as scheduled periodic tasks using Celery Beat.
Production Deployment
Deploying Celery in production requires careful configuration to ensure reliability, security, and performance.
Serialization and Security
Always use JSON serialization in production. Python's pickle serializer can execute arbitrary code during deserialization, making it a serious security risk if your broker is accessible to untrusted parties:
# In your Celery config — ALWAYS set these in production
app.conf.update(
task_serializer='json',
result_serializer='json',
accept_content=['json'],  # Refuse pickle and other insecure formats
content_encoding='utf-8',
)
Preventing Task Loss with Late Acknowledgment
By default, Celery acknowledges (removes) a task from the queue before it starts executing. This means if a worker crashes mid-task, the task is lost. Use acks_late to acknowledge only after the task completes:
# Global setting
app.conf.task_acks_late = True
app.conf.task_reject_on_worker_lost = True  # Requeue task if worker is killed
# Or per-task
@app.task(acks_late=True, reject_on_worker_lost=True)
def critical_payment_task(payment_id):
process_payment(payment_id)
Worker Concurrency and Pool Types
Celery supports different execution pool types, each suited for different workloads:
# prefork (default) — best for CPU-bound tasks
# Uses multiprocessing, one process per core
celery -A tasks worker --pool=prefork --concurrency=4
# gevent — best for I/O-bound tasks (API calls, database queries)
# Uses green threads, can handle thousands of concurrent tasks
pip install gevent
celery -A tasks worker --pool=gevent --concurrency=100
# eventlet — similar to gevent, alternative green thread library
pip install eventlet
celery -A tasks worker --pool=eventlet --concurrency=100
# solo — single-threaded, useful for debugging
celery -A tasks worker --pool=solo
Memory Leak Prevention
Long-running workers can accumulate memory. Use worker_max_tasks_per_child to automatically restart worker processes after a set number of tasks:
# Restart worker process after every 1000 tasks to prevent memory leaks
app.conf.worker_max_tasks_per_child = 1000
# Control how many tasks workers prefetch from the broker
# Set to 1 for fair distribution with long-running tasks
app.conf.worker_prefetch_multiplier = 1
Docker Compose Deployment
A typical production setup runs the web app, Celery worker, Celery Beat, and Redis together using Docker Compose:
# docker-compose.yml
version: '3.8'
services:
redis:
image: redis:7-alpine
ports:
- "6379:6379"
volumes:
- redis_data:/data
web:
build: .
command: gunicorn myproject.wsgi:application --bind 0.0.0.0:8000
environment:
- CELERY_BROKER_URL=redis://redis:6379/0
depends_on:
- redis
celery_worker:
build: .
command: celery -A myproject worker --loglevel=info --concurrency=4
environment:
- CELERY_BROKER_URL=redis://redis:6379/0
depends_on:
- redis
celery_beat:
build: .
command: celery -A myproject beat --loglevel=info
environment:
- CELERY_BROKER_URL=redis://redis:6379/0
depends_on:
- redis
volumes:
redis_data:
Best Practices and Tips
🎯 Keep Tasks Simple: Each task should focus on doing one thing well. Break complex operations into multiple smaller tasks that can be chained together.
🔄 Make Tasks Idempotent: Design your tasks so they can be safely retried. If a task runs twice with the same input, it should produce the same result without side effects.
⏱️ Use Appropriate Timeouts: Set reasonable time limits for tasks to prevent workers from getting stuck on hanging operations.
📊 Monitor Your Workers: Use Flower or other monitoring tools to keep track of task execution, worker health, and queue sizes.
⚠️ Handle Failures Gracefully: Always implement proper error handling and decide whether tasks should retry automatically or fail immediately.
📈 Scale Horizontally: When your workload grows, add more workers rather than trying to make individual workers handle more tasks.
🚫 Disable Results When Not Needed: If you don't need to check task return values, disable the result backend for better performance:
# Globally
app.conf.task_ignore_result = True
# Or per-task
@app.task(ignore_result=True)
def fire_and_forget_task():
# No result stored
pass
🗃️ Pass IDs, Not Objects: Never pass ORM model instances or large objects as task arguments. They get serialized and may contain stale data by the time the worker processes them. Always pass IDs and fetch fresh data inside the task:
# ❌ Bad: passing a Django model instance
# send_notification.delay(user)
# ✅ Good: pass the ID, fetch fresh data in the task
@shared_task
def send_notification(user_id):
from myapp.models import User
user = User.objects.get(id=user_id)  # Fresh data from database
# ... process notification
🧪 Use Eager Mode for Testing: In your test settings, run tasks synchronously so you can test them like regular functions without needing a running worker or broker:
# In settings_test.py or conftest.py
CELERY_TASK_ALWAYS_EAGER = True
CELERY_TASK_EAGER_PROPAGATES = True  # Propagate exceptions in tests
📝 Use Celery's Built-in Logger: Use get_task_logger instead of Python's standard logger for proper task context in logs:
from celery.utils.log import get_task_logger
logger = get_task_logger(__name__)
@app.task(bind=True)
def my_task(self, data):
logger.info(f"Processing task {self.request.id} with data: {data}")
# ... task logic
logger.info(f"Task {self.request.id} completed successfully")
Common Pitfalls to Avoid
Don't Pass Large Objects: Task arguments are serialized and passed through the broker. Pass IDs or references instead of large objects like images or datasets.
Avoid Database Connections in Task Definitions: Create database connections inside the task function, not at module level, to prevent connection pooling issues.
Don't Ignore Result Backend Configuration: If you need to track task results, make sure your
result backend is properly configured. If you don't need results, explicitly disable them with ignore_result=True.
Watch Out for Memory Leaks: Long-running workers can accumulate memory. Use worker_max_tasks_per_child to restart worker processes periodically.
Don't Use a Relational Database as a Broker: While Celery supports databases as brokers (via SQLAlchemy or Django ORM), this is strongly discouraged in production. Databases were not designed for high-throughput message passing and can suffer from deadlocks, race conditions, and poor performance under load. Use Redis or RabbitMQ instead.
Celery vs Alternatives
While Celery is the most popular Python task queue, alternatives exist for different use cases:
Dramatiq features a simpler API with fewer configuration options and built-in support for rate limiting and priorities. It doesn't require a result backend. Best for projects that want a modern, opinionated task queue with less boilerplate. Dramatiq Documentation
Huey is a lightweight task queue with minimal dependencies. It supports Redis and SQLite as backends. Best for small to medium projects that don't need the full power of Celery. Huey Documentation
RQ (Redis Queue) is a simple Python library that uses Redis for task queuing. It has fewer features than Celery but is extremely easy to set up and understand. Best for projects that only need basic background task processing. RQ Documentation
When to choose Celery: Celery remains the best choice when you need a battle-tested solution with a mature ecosystem, support for multiple brokers, complex workflows (Canvas), periodic scheduling (Beat), comprehensive monitoring (Flower), and the ability to scale to millions of tasks per day. Its large community means extensive documentation, tutorials, and third-party integrations.
Conclusion
Celery is an essential tool for building scalable Python applications. By moving time-consuming operations to background workers, you can create responsive applications that handle heavy workloads gracefully. Whether you're building a small web application or a large distributed system, Celery provides the flexibility and power you need to manage asynchronous tasks effectively.
Start with the basics: install Celery, choose a message broker, and create simple tasks. As you become more comfortable, explore advanced features like task chains, periodic scheduling, task routing, and production deployment strategies. Remember that Celery is highly configurable, and you can tune it to meet your specific needs as your application grows.
References and Further Reading
- Official Celery Documentation — The comprehensive guide to all Celery features
- First Steps with Celery — Official getting started guide
- Real Python: Asynchronous Tasks with Django and Celery — Detailed Django integration tutorial
- Flask Official: Using Celery — Official Flask integration guide
- Flower Documentation — Official documentation for the Flower monitoring tool
- Canvas: Designing Workflows — Official guide to task workflows
- Celery Task Routing — Official guide to routing tasks to queues
- Toptal: Orchestrating Celery Python Background Jobs — Advanced workflow patterns
- TestDriven.io: Running Background Tasks from Django Admin — Practical integration examples
- Full Stack Python: Celery — Curated resources and tutorials
- Celery Backends and Brokers — Choosing the right broker and backend
- PEP 20 — The Zen of Python — Tim Peters' guiding principles for Python
- Celery GitHub Repository — Source code, issues, and community contributions
- Dramatiq Documentation — Alternative task queue for Python
- RQ (Redis Queue) Documentation — Simple Redis-based task queue